Shuhei Kagawa

Generating Twitter Card images from blog post titles

Oct 13, 2019 - Blog, JavaScript

Twitter shows links to some websites as nice cards with images, but not for all websites. I realized that Twitter didn't show the card for my blog. Why? It turned out that they were called Twitter Cards, and Twitter showed them for websites that provided specific metadata. Is it common sense? Maybe, but I didn't know.

Twitter Cards give websites an ability to add an image, a video, etc. when they are shared on Twitter. A Twitter Card makes a tweet (physically) 3x more visible on the timeline. This post explains how I generated images from post titles using node-canvas, inspired by Hatena Blog.

Twitter Card preview

Meta tags

Twitter's bots look for <meta> tags in your page. If your page has a certain meta tags, it shows a Twitter Cards for links to the page. Check the documentation for more details. The <meta> tags look like these:

<meta name="twitter:card" content="summary_large_image" />
<meta name="twitter:site" content="@your_twitter_account" />

<meta name="twitter:title" content="My Blog Post" />
<meta name="twitter:description" content="This is a blog post." />
<meta name="twitter:image" content="https://test.com/images/foo.png" />

Uh, they look a bit too platform-specific. twitter:card and twitter:site are specific to Twitter, but what about twitter:title, twitter:description and twitter:image? Twitter's bots also pick up Open Graph metadata tags, which are also used by other platforms like Facebook. So, we can use the og: tags instead of twitter: tags. Be careful that the attribute name of Open Graph metadata is property instead of name!

<meta property="og:title" content="My Blog Post" />
<meta property="og:description" content="This is a blog post." />
<meta property="og:image" content="https://test.com/images/foo.png" />

Homemade static site generator

My blog is built with gulp and some custom plugins and deployed to GitHub Pages. I started the blog with Octopress several years ago and rewrote it with gulp when I was fascinated with gulp and JavaScript build tools. I once added React as a template engine and removed it later. Because of the history, its directory structure stays similar to the original one of Octopress. I write markdown files like source/_posts/2019-10-13-foo.md and the build system generates HTMLs like /blog/2019/10/13/foo/index.html.

To add Open Graph meta tags, I wrote a gulp plugin. Each gulp plugin is a transform stream that consumes and produces vinyl file objects. First, I made the plugin to extract image URLs from HTML and added necessary meta tags to the HTML template for <head> tag. Now, posts with at least one image got Twitter Cards.

Image generation and text wrapping

Most of my posts didn't have any images, while Twitter Cards don't look great without images. But I'm too lazy to create an image for each blog post manually.

I found that Hatena Blog, a blogging platform in Japan, was generating images from blog post titles and descriptions. It's a neat idea to promote blog posts without manual effort of blog authors. Can I replicate the image generation?

I found that many image-generation npm packages were using node-canvas. It provides the canvas API for Node.js and supports export options, including PNG. I decided to try that.

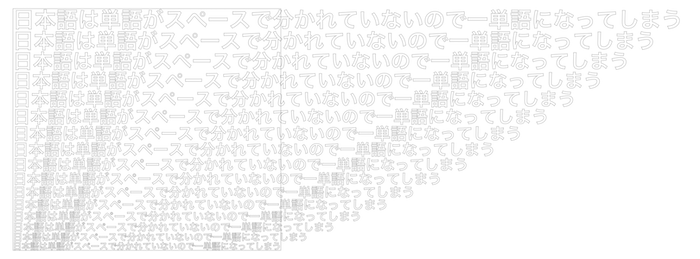
The canvas API was easy to use for me, but it doesn't provide text wrapping. I needed to come up with a way to break texts into lines. As a Q&A on Stackoverflow suggested, I used ctx.measureText(text) to measure the width of the text and remove words until the subtext fits the given width. And do the same for the remaining text.

The first line of this text wrapping algorithm is visualized as follows (it actually happens on the same line, but showing each try in its line for illustration):

Wrapping text

There were two edge cases to be covered. The first case is that a long word doesn't fit into the given width. The other case is that the text is split into too many lines, and they overflow the given height. I covered them by decreasing the font size until the entire text fits into the given rectangle.

The algorithm for the first edge case is visualized as follows (it tries smaller fonts until the word fits into the width):

Try smaller font sizes

I eventually came up with JavaScript code like this (the full code is on GitHub):

function fitTextIntoRectangle({ ctx, text, maxFontSize, rect }) {
  // Reduce font size until the title fits into the image.
  for (let fontSize = maxFontSize; fontSize > 0; fontSize -= 1) {
    ctx.font = getTitleFont(fontSize);
    let words = text.split(" ");
    let { y } = rect;
    const lines = [];
    while (words.length > 0) {
      let i;
      let size;
      let subtext;
      // Remove words until the rest fit into the width.
      for (i = words.length; i >= 0; i -= 1) {
        subtext = words.slice(0, i).join(" ");
        size = ctx.measureText(subtext);

        if (size.width <= rect.width) {
          break;
        }
      }

      if (i <= 0) {
        // A word doesn't fit into a line. Try a smaller font size.
        break;
      }

      lines.push({
        text: subtext,
        x: rect.x,
        y: y + size.emHeightAscent
      });

      words = words.slice(i);
      y += size.emHeightAscent + size.emHeightDescent;
    }

    const space = rect.y + rect.height - y;
    if (words.length === 0 && space >= 0) {
      // The title fits into the image with the font size.
      // Vertically centering the text in the given rectangle.
      const centeredLines = lines.map(line => {
        return {
          ...line,
          y: line.y + space / 2
        };
      });
      return {
        fontSize,
        lines: centeredLines
      };
    }
  }

  throw new Error(
    `Text layout failed: The given text '${text}' did not fit into the given rectangle ${JSON.stringify(
      rect
    )} even with the smallest font size (1)`
  );
}

Font

My website is using IBM Plex Sans via Google Fonts. I wanted to use the same font in the images. Fortunately, node-canvas provides an API to load fonts, and the font is available also on npm.

yarn add -D @ibm/plex
const { registerFont } = require("canvas");

registerFont(
  "./node_modules/@ibm/plex/IBM-Plex-Sans/fonts/complete/otf/IBMPlexSans-Bold.otf",
  {
    family: "IBM Plex Sans",
    weight: "bold"
  }
);

// ...

ctx.font = "bold 30px 'IBM Plex Sans'";

Done!

So, the feature is done. It looked trivial at first glance, but the text wrapping algorithm was fun to write. Now I got to write more blog posts to use this feature!

Migrating from bash to zsh

Oct 8, 2019 - zsh

A few days ago, I updated my Macbook Air to macOS Catalina. The installation took some time, but it was done when I got up the next morning. The applications that I use seemed to work fine on Catalina. But bash started complaining at the beginning of new sessions.

The default interactive shell is now zsh.
To update your account to use zsh, please run `chsh -s /bin/zsh`.
For more details, please visit https://support.apple.com/kb/HT208050.

I asked whether I should migrate to zsh on Twitter. Three people said "yes" as if it was common sense. OK, let's migrate.

Changing the default shell of tmux

First, I followed the instruction from Apple.

chsh -s /bin/zsh

However, it didn't change the default shell of tmux. I restarted sessions in tmux, and restarted iTerm 2 and the tmux server. But tmux still started bash sessions. Why?

I googled. There was a Q&A for the exact problem on superuser. The default-command option of tmux is the default shell. I had a hardcoded bash there! By the way, reattach-to-user-namespace is for sharing Mac's clipboard with tmux.

set-option -g default-command "reattach-to-user-namespace -l bash"

I updated it with SHELL environment variable so that I can migrate to any shell in the future!

set-option -g default-command "reattach-to-user-namespace -l ${SHELL}"

Command prompt

Then I installed oh-my-zsh and copied my .bash_profile to .zshrc. Most of the content of my .bash_profile were aliases and PATHs. They worked fine on zsh too.

But zsh has a different format for prompt. oh-my-zsh provides a lot of nice prompt themes, but I wanted to keep using the one that I had configured with bash. Let's migrate it to zsh.

oh-my-zsh has a directory for custom themes (.oh-my-zsh/custom/themes). I moved the custom directory to my dotfiles repo and symlinked it so that I can manage my custom theme with Git without forking oh-my-zsh itself. [Update on Oct 24, 2019] I realized that this symlink approach prevents updates of oh-my-zsh because it modifies the files in the git local clone of oh-my-zsh. The official customization guide recommends to use ZSH_CUSTOM variable to specify the location of a custom directory. Now I'm using ZSH_CUSTOM to point to a directory in my dotfiles repo.

Eventually, I came up with a theme like this:

my custom theme

ZSH_THEME_GIT_PROMPT_PREFIX="%{$fg[white]%}("
ZSH_THEME_GIT_PROMPT_SUFFIX="%{$fg[white]%})%{$reset_color%}"
ZSH_THEME_GIT_PROMPT_DIRTY="*"
ZSH_THEME_GIT_PROMPT_CLEAN=""

# %~ is the current working directory relative to the home directory
PROMPT='[$FG[228]%~%{$reset_color%}]'
PROMPT+=' $(git_prompt_info)'
PROMPT+=' %(?.$FG[154].$FG[009])€%{$reset_color%} '

Each oh-my-zsh theme defines a variable called PROMPT. Aside from its syntax, I was not sure how and when PROMPT was evaluated. In hindsight, it is a string that is built once when a session starts or source .zshrc. Every time a prompt is shown, PROMPT is evaluated, meaning escapes (starting with %) and variables in it are expanded.

Colors

At the beginning, I was baffled by how to specify colors. For example, the following PROMPT shows "some red text" in red.

PROMPT='%{$fg[red]%}some red text%{$reset_color%}'

$fg[red] has the code that makes its following text red. $reset_color has the code that resets the color. The tricky part is that these codes need to be surrounded by %{ and %} in PROMPT.

zsh provides handy variables for colors.

  • reset_color
  • fg, fg_bold, fg_no_bold: They are associative arrays (similar to JavaScript objects).
  • bg, bg_bold, bg_no_bold

Also, oh-my-zsh provides 256 colors.

  • FX: This has codes for text effects like FX[underline].
  • FG: 256 colors for foreground like FG[102].
  • BG: 256 colors for background like BG[123].

spectrum_ls and spectrum_bls commands show you all the 256 colors! Note that values in FX, FG and BG are already surrounded by %{ and %}, and we don't need to do it again.

We can examine those variables in the terminal.

echo "${fg[yellow]}hello${reset_color} ${bg[green]}world${reset_color}"

# `(kv)` extracts key values from an associative array.
echo ${(kv)fg}
echo ${(kv)FG}

Exit code

With bash, I had a trick to change the color of the prompt by the previous command's exit code. How can I achieve this with zsh?

Change color by exit code

Surprisingly, zsh prompt expression has a special syntax for switching prompt by exit code. To be accurate, it's a combination of a ternary operator and ? for exit code check.

# Shows "foo" if the exit code is 0 and "bar" if the exit code is non-zero.
%(?.foo.bar)

The following expression shows the Euro sign in green if the exit code is 0 and in red if the exit code is non-zero.

%(?.%{$fg[green]%}.%{$fg[red]%})€%{$reset_color%}

Git info

git_prompt_info() function outputs git info such as the branch name and the state of the working tree (clean or dirty). We can customize its output by ZSH_THEME_GIT_PROMPT_* variables.

I wrote something like this:

ZSH_THEME_GIT_PROMPT_PREFIX="%{$fg[white]%}("
ZSH_THEME_GIT_PROMPT_SUFFIX="%{$fg[white]%})%{$reset_color%}"
ZSH_THEME_GIT_PROMPT_DIRTY="*"
ZSH_THEME_GIT_PROMPT_CLEAN=""

PROMPT="... $(git_prompt_info) ..."

I thought it was done and went back to work. But when I switched the git branch, the prompt stayed the same. Why? I googled again. There was an issue for the same problem. The PROMPT needs to be created with single quotes instead of double quotes so that dynamic parts are not evaluated when it's defined!

PROMPT='... $(git_prompt_info) ...'

Conclusion

I have migrated my terminal from bash to zsh. My initial motivation was passive (Catalina deprecated bash), but it's always fun to try something new (to me). I'm looking forward to trying cool zsh plugins and tricks!

Writing an interpreter and a compiler in Rust

Oct 6, 2019 - Rust

In the spring of this year, I read Writing an Interpreter in Go and Writing a Compiler in Go by Thorsten Ball, and implemented an interpreter and a compiler from the books in Rust. (I started writing this post in April but left unfinished for six months. Now I'm finishing it.)

The first book Writing an Interpreter in Go is about writing a parser and an interpreter for a programming language called Monkey. Monkey's feature set is limited, but it has some interesting features that modern programming languages have—such as function as a first-class citizen and closures.

let fibonacci = fn(x) {
    if (x == 0) {
        0
    } else {
        if (x == 1) {
            1
        } else {
            fibonacci(x - 1) + fibonacci(x - 2)
        }
    }
};
fibonacci(15);

The second book Writing a Compiler in Go taught me to write a simple compiler and a simple virtual machine. The compiler compiles Monkey scripts into instructions (and constants), and the virtual machine executes the instructions. For example, an expression 1 + 2 is compiled into:

// Constants
vec![
    Object::Integer(1),
    Object::Integer(2),
]

// Instructions
vec![
    make_u16(OpCode::Constant, 0),
    make_u16(OpCode::Constant, 1),
    make(OpCode::Add),
    make(OpCode::Pop),
]

How I started

I had bought Writing an Interpreter in Go more in 2017, but it had been sleeping in my bookshelf (Tsundoku). Recently, I wanted to relearn a little Go for work. I took the book from my bookshelf and started following the book—typing the code in Go. I did two chapters, and new Go syntaxes stopped appearing. I achieved my initial purpose—relearning Go—earlier than I thought because the book used a limited set of Go's language features. Then Rust came to my mind.

Before starting this project, I had written two simple command-line tools with Rust (colortty and ynan26), but they were too small to learn different aspects of Rust. I wanted to learn more by implementing something not trivial.

Good things about Rust

First, I rewrote what I had written in Go with Rust and continued the rest of the book. The implementation in Rust was less redundant than the one in Go. Also, it was more type-safe thanks to enums and Result. Especially enums were perfect for AST (Abstract Syntax Tree) and evaluated objects.

// An example of AST
#[derive(Debug, PartialEq, Clone, Hash, Eq)]
pub enum Expression {
    Identifier(String),
    IntegerLiteral(i64),
    StringLiteral(String),
    Boolean(bool),
    Array(Vec<Expression>),
    Hash(HashLiteral),
    Index(Box<Expression>, Box<Expression>),
    Prefix(Prefix, Box<Expression>),
    Infix(Infix, Box<Expression>, Box<Expression>),
    If(Box<Expression>, BlockStatement, Option<BlockStatement>),
    FunctionLiteral(Vec<String>, BlockStatement),
    Call(Box<Expression>, Vec<Expression>),
}

However, harder parts came later when the compiler and the virtual machine grew complex.

Nested symbol tables were a linked list

To implement nested scopes, the Compiler Book uses self-recursive structs for nested symbol tables. I was struggling with their ownership. I tried Rc and RefCell, but still was not able to get through them.

Then, I went to Rust Hack and Learn—a local meetup at Mozilla Berlin office—and asked how to get over ownership rules. One person (sorry, I didn't ask his name!) recommended me a book Learn Rust With Entirely Too Many Linked Lists .

The book introduces several versions of linked list implementations in Rust even though its precaution is not to implement linked lists in Rust. It had some techniques that I had recently learned, and much more. After a while, I realized that I had been trying to implement a linked list. Then I changed the self-recursive struct to a Vec, and it solved most of my headaches. So, the book's precaution was right. Don't implement a liked list.

// Before
struct SymbolTable {
  store: HashMap<String, Symbol>,

  // This is a linked list!
  outer: Option<SymbolTable>;
}

// After
struct SymbolLayer {
  store: HashMap<String, Symbol>,
}

struct SymbolTable {
  current: SymbolLayer;
  outers: Vec<SymbolLayer>;
}

I learned basics of how programs work at low-level

Even before starting the project, I had some vague ideas about parser, interpreter and compiler thanks to my previous projects. But I hadn't had concrete ideas about compilers, especially about how to translate high-level code like function calls and closures into low-level instructions. After the project, now I can confidently say what is on the stack and what is on the heap.

Also, the knowledge about stack was useful to understand some of the concepts of Rust itself. Rust's compiler to know the sizes of types because it needs to generate machine code that allocates values of the types on the stack.

Conclusion

It was a fun project. I learned something, but there is much more to learn in Rust. Also, now I can admire modern interpreters and compilers like V8 more than before.

Writing an Interpreter in Go and Writing a Compiler in Go are great. I liked their hands-on approach with many unit tests.