Generating Twitter Card images from blog post titles
Twitter shows links to some websites as nice cards with images, but not for all websites. I realized that Twitter didn't show the card for my blog. Why? It turned out that they were called Twitter Cards, and Twitter showed them for websites that provided specific metadata. Is it common sense? Maybe, but I didn't know.
Twitter Cards give websites an ability to add an image, a video, etc. when they are shared on Twitter. A Twitter Card makes a tweet (physically) 3x more visible on the timeline. This post explains how I generated images from post titles using node-canvas, inspired by Hatena Blog.

Meta tags
Twitter's bots look for <meta> tags in your page. If your page has a certain meta tags, it shows a Twitter Cards for links to the page. Check the documentation for more details. The <meta> tags look like these:
<meta name="twitter:card" content="summary_large_image" />
<meta name="twitter:site" content="@your_twitter_account" />

<meta name="twitter:title" content="My Blog Post" />
<meta name="twitter:description" content="This is a blog post." />
<meta name="twitter:image" content="https://test.com/images/foo.png" />
Uh, they look a bit too platform-specific. twitter:card and twitter:site are specific to Twitter, but what about twitter:title, twitter:description and twitter:image? Twitter's bots also pick up Open Graph metadata tags, which are also used by other platforms like Facebook. So, we can use the og: tags instead of twitter: tags. Be careful that the attribute name of Open Graph metadata is property instead of name!
<meta property="og:title" content="My Blog Post" />
<meta property="og:description" content="This is a blog post." />
<meta property="og:image" content="https://test.com/images/foo.png" />
Homemade static site generator
My blog is built with gulp and some custom plugins and deployed to GitHub Pages. I started the blog with Octopress several years ago and rewrote it with gulp when I was fascinated with gulp and JavaScript build tools. I once added React as a template engine and removed it later. Because of the history, its directory structure stays similar to the original one of Octopress. I write markdown files like source/_posts/2019-10-13-foo.md and the build system generates HTMLs like /blog/2019/10/13/foo/index.html.
To add Open Graph meta tags, I wrote a gulp plugin. Each gulp plugin is a transform stream that consumes and produces vinyl file objects. First, I made the plugin to extract image URLs from HTML and added necessary meta tags to the HTML template for <head> tag. Now, posts with at least one image got Twitter Cards.
Image generation and text wrapping
Most of my posts didn't have any images, while Twitter Cards don't look great without images. But I'm too lazy to create an image for each blog post manually.
I found that Hatena Blog, a blogging platform in Japan, was generating images from blog post titles and descriptions. It's a neat idea to promote blog posts without manual effort of blog authors. Can I replicate the image generation?
I found that many image-generation npm packages were using node-canvas. It provides the canvas API for Node.js and supports export options, including PNG. I decided to try that.
The canvas API was easy to use for me, but it doesn't provide text wrapping. I needed to come up with a way to break texts into lines. As a Q&A on Stackoverflow suggested, I used ctx.measureText(text) to measure the width of the text and remove words until the subtext fits the given width. And do the same for the remaining text.
The first line of this text wrapping algorithm is visualized as follows (it actually happens on the same line, but showing each try in its line for illustration):

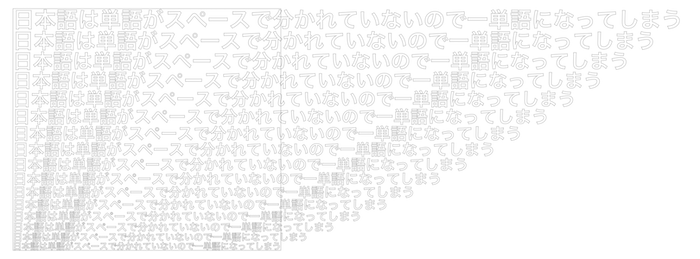
There were two edge cases to be covered. The first case is that a long word doesn't fit into the given width. The other case is that the text is split into too many lines, and they overflow the given height. I covered them by decreasing the font size until the entire text fits into the given rectangle.
The algorithm for the first edge case is visualized as follows (it tries smaller fonts until the word fits into the width):

I eventually came up with JavaScript code like this (the full code is on GitHub):
function fitTextIntoRectangle({ ctx, text, maxFontSize, rect }) {
  // Reduce font size until the title fits into the image.
  for (let fontSize = maxFontSize; fontSize > 0; fontSize -= 1) {
    ctx.font = getTitleFont(fontSize);
    let words = text.split(" ");
    let { y } = rect;
    const lines = [];
    while (words.length > 0) {
      let i;
      let size;
      let subtext;
      // Remove words until the rest fit into the width.
      for (i = words.length; i >= 0; i -= 1) {
        subtext = words.slice(0, i).join(" ");
        size = ctx.measureText(subtext);

        if (size.width <= rect.width) {
          break;
        }
      }

      if (i <= 0) {
        // A word doesn't fit into a line. Try a smaller font size.
        break;
      }

      lines.push({
        text: subtext,
        x: rect.x,
        y: y + size.emHeightAscent
      });

      words = words.slice(i);
      y += size.emHeightAscent + size.emHeightDescent;
    }

    const space = rect.y + rect.height - y;
    if (words.length === 0 && space >= 0) {
      // The title fits into the image with the font size.
      // Vertically centering the text in the given rectangle.
      const centeredLines = lines.map(line => {
        return {
          ...line,
          y: line.y + space / 2
        };
      });
      return {
        fontSize,
        lines: centeredLines
      };
    }
  }

  throw new Error(
    `Text layout failed: The given text '${text}' did not fit into the given rectangle ${JSON.stringify(
      rect
    )} even with the smallest font size (1)`
  );
}
Font
My website is using IBM Plex Sans via Google Fonts. I wanted to use the same font in the images. Fortunately, node-canvas provides an API to load fonts, and the font is available also on npm.
yarn add -D @ibm/plex
const { registerFont } = require("canvas");

registerFont(
  "./node_modules/@ibm/plex/IBM-Plex-Sans/fonts/complete/otf/IBMPlexSans-Bold.otf",
  {
    family: "IBM Plex Sans",
    weight: "bold"
  }
);

// ...

ctx.font = "bold 30px 'IBM Plex Sans'";
Done!
So, the feature is done. It looked trivial at first glance, but the text wrapping algorithm was fun to write. Now I got to write more blog posts to use this feature!